Showing posts with label 2016. Show all posts

Thursday, January 12, 2017

My personal list for best Korean actors of 2016

As promised, I have another post up.
Though it wasn't the same day but it's so rare to have me upload another post the next day right? 
So, YAY!!!
Do you like tsum tsum? I am in love~


Anyone who knows me probably knows how much I love watching korean dramas.
I basically grew up watching korean dramas without knowing it was korean. LOL.
There wasn't korean craze going on in my country when the dramas were played on my national television program (Or maybe there was? IDK).
Every korean dramas were so good to me at that time. HAHAHA. Oh come on you can't expect much from a young girl right?
Now that I am grown up, not very grown but I am maturing. I know how to differentiate between good and bad acting. (I hope? HAHA.)
Anyways, this is obviously my own. VERY OWN PERSONAL LIST for best korean actors of 2016. (Don't hate me so much if your favourite isn't on my list.)
The actors who make it to my list obviously captured my heart in the year of 2016 with their wonderful, amazing, almost perfect acting with very little flaws that I can bear with.
Let's get the list going~


10. Park Bo Gum / Yoo Ah In
9. Song Joong Ki
8. Ryu Jun Yeol
7. Kang Ha Neul
6. Lee Dong Wook/ Lee Je Hoon
5. Park Hae Jin/ Lee Jun Ki
4. Kim Rae Won/ Lee Sang Yoon
3. Yoo Seung Ho/ Cho Jin Woong
2. Ji Chang Wook/ Jo Jong Suk
1. Gong Yoo/ Nam Goong Min


Honorable Korean Actors (Every time they appear on screen, I have nothing to say but fantastic acting.):

So Ji Sub
Park Shin Yang
Han Suk Kyu

Since I don't feel like sleeping yet, I shall make a list of Korean dramas!

Favourite Dramas of 2016 (A drama which touches my heart and I know I can talk about the drama forever and where ever):

1. Remember
2. Signal
3. Romantic Doctor Teacher Kim

Memorable Dramas of 2016 (A drama which will pop out in my mind when I am feeling it~):

1. Reply 1988
2. Jealousy Incarnate

Beautiful Dramas of 2016 (From writing to acting to editing to music, the drama is just beautiful):

1. On the Way to the Airport
2. Please come back Mister

Goosebumps Dramas of 2016 (The writers did an amazing job):

1. Six Flying Dragon
2. Flower in the prison

Oh the fluff Dramas of 2016 (This is when the main couple is full of cuteness, their acting do not have to be amazing though):
1. Weightlifting Fairy Kim Bok Joo
2. Shopping King Louie

3. Oh My Venus

EXTRAS~
Favourite movies of 2016:

1. Fantastic Beast and where to find them
2. Train to Busan
3. Kimi no Na Wa (Your Name)
4. Detective Conan Movie: The Darkest Nightmare
5. Angry Bird

I just found out How To Train Your Dragon won't be out till 2019!!!
What am I going to do for 2 more years?!
ARGHHHHH!!!!
NVM, it is worth the wait because toothless and hiccup are the cutest and has the most beautiful relationship in the entire world of DREAMWORKS!!!
Come on Dreamworks, don't disappoint and surprise us (fans of HTTYD) once again! See you dragon riders in 2019! Meanwhile I shall rewatch all episodes of HTTYD TV Series. HEHE.

Good night~ I am going to do a list of Korean Actress for my next post!
Till then!
XOXO, Mahirah

Currently watching Goblin.
I am so done.
If you're wondering why goblin isn't in the list, I am planning to put them for 2017. LOL.

Wednesday, January 11, 2017

DIY Hogwarts Cloak (Griffindor Version)

My Harry Potter feels are back. 

Maybe it's the season or my withdrawal syndrome from fantastic beasts movie.
I don't know but I am enjoying it. Oh, Happy 2017 my lovely readers~
Let's get started!

Materials: 
  1. 2-3m of black coloured fabric
  2. 2-3m of maroon coloured fabric
  3. Sewing machine
  4. Thread (black and maroon)
  5. A pair of scissors
  6. Ruler
  7. Large pieces of paper

Creating the pattern:
I SWEAR I AM SO USELESS. I DO NOT HAVE MANY PICTURES. I AM SO SORRY!!!
  1.  Copy from your favourite tshirt the front bodice and back bodice.
  2. Widen lengthen and widen the sides to make it more flare out.
  3. Back bodice will be on fold while the front bodice mark it X2.

 3. Create your own sleeve by copying it against the front and back bodice.


4. Roughly sketch a hoodie (use your coat or jacket as references)


Cutting the fabric:

Cut out all the patterns on both the maroon and black fabric.
You will end up with:

  1.  2 pieces of Front Bodice- Maroon
  2.  2 pieces of Front Bodice- Black
  3. 1 piece of Back Bodice- Maroon
  4. 1 piece of Back Bodice- Black
  5. 2 pieces of Sleeve- Maroon
  6. 2 pieces of Sleeve- Black
  7. 2 pieces of Hoodie- Maroon
  8. 2 pieces of Hoodie- Black


    Assembling the pieces:
    I started on the maroon pieces then the black pieces.

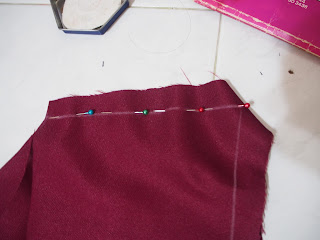
    1. Sew the shoulders together.

    2. Attach the sleeves to the armhole area.
    3. Sew the side seam.

    4. Attach the hoodie to the collar area. The final piece will be called Y.
    5. Repeat step 1-4 using the black pieces.
    6. Now we have to make the Y (maroon) be a lining to Y (black).
    7. Sew the Y maroon to Y (black) with right sides facing each other along the hoodie area leaving the sleeves and hemline.
    8. Turn the cloak inside out.
    9. Hem the bottom and sleeves.


    Final touch:

    Print out Griffindor logo using transfer paper or sew the embroidery of the logo to the cloak.

    End product:


    Btw have you guys watched Fantastic Beast? I find it to be the best movie of 2016. Which movie is your most favourite for 2016? Also what movie are you most looking forward to? Anyways, I hope that this post will be useful for some harry potter fans out there.
    OH, I may be posting another one if I am not feeling tired. HAHA.
    Till then~  Stay happy and healthy!!!


    Recommended Anime: Orange
    I was prepared to get myself emotional and this anime has done it.
    It is beautiful. Absolutely amazing!
    I have yet to read the manga/ novel (I forgot if it was a novel or manga or both. HAHA). 
    Maybe I will when the books are available again in Kinokuniya.
    I am regretting so much for not buying the books when they were there! ARGH!!!


    Tuesday, May 17, 2016

    DIY: Cardigan

    Hey my wonderful readers!
    It's time to learn how to sew yourself a cardigan.

    Materials:
    • Knit Fabric
    • Sewing machine
    • Thread
    • A pair of scissors
    • Buttons (Optional)
    • Paper (For making pattern)
     1. Making the pattern

    Using your favourite cardigan or sweater, trace out the front, back and sleeve pattern on pieces of paper.

    If your cardigan has a hoodie, you might want to trace it out.
     
    2. Cutting the fabric

    Once your patterns are ready, use the scissors to cut out the pattern with an additional 0.5-1" allowances around the edges.


    3. Assembling the pieces

    *ensure that the right-right sides are facing each other before sewing
    *working with knit fabric without a serger or overlock machine may requires you to use zigzag stitching

    Firstly, pin and sew the shoulder pieces together.


    Secondly, pin and sew the sleeves to the respective armhole.


    Thirdly, pin the raw edges of the sleeves and the side seam. Once you're done pinning, you can sew the sleeve and the side.


    +This applies to those who have/like to have a hoodie+ 
    Lastly, pin and sew the hoodie to the collar area and close the hoodie by sewing the top part.


    4. Finishing touches

    Cut out a long strip of fabric with a width of 2" with the length of raw edges. This strip acts as a bias tape hence sew it around the raw edges of the cardigan.

    You may add buttons and button holes to the bias tape. Also, you may like to have small pockets at the front of the cardigan which will make it extra cute.

    So how did my cardigan turn out?


    I will be redoing the bias tape because the length was too short which caused my cardigan to curl.
    Hence it is important that your bias tape is long enough to prevent curling. Other than that, I am satisfied with the end result. Once my bias tape is redone, I will be adding buttons to it! HEHE.
    Also, I will upload a new photo soon with a better output!


    This smock dress is by far the best thing I've ever sew! *Dances*

    Recommended drama: Flower in the prison


    Friday, May 6, 2016

    Part 1: Smock Dress

    I've finally finished playing Dead Space 3!!!
    Woo-hoo~~~

    I am finally blogging! I know it's been a while. I wasn't in the mood to update and every time I wanted to, I ended up doing something else. Why do I suddenly decide to blog? I realised that I won't be able to update my blog since I am unable to sew this week! :(

    As the title goes, I am going to teach you how to make your very own smock dress!!! :D

    Materials:
    2-2.5m of fabric
    Thread
    Sewing machine
    Needles


    Step 1: Making the pattern


    Take your favourite Dress or Top
    Fold it into half.

    Trace out the bodice. (I did not trace out the whole length of the top but only to where I want the bodice to end)

    I am very lazy to make a pattern for both the front and back bodice hence I decided to roughly draw a curve at the neck line to differentiate the front and back of the bodice. (The first curve is an alteration to the back bodice)

    Then I snip off the first curve which will be my back bodice neckline.

    In case you have no idea what I was talking about. I labelled for you! HEHE!
    Draft out the sleeve.
    Step 2: Cutting the fabric (Bodice & Sleeve)

     Pin the pattern to the fabric and cut out the back bodice.

    Follow the previous step. To get the front bodice, cut out the back neckline.

    Now, you will have both the front and back bodice! YAY!

    Follow the sleeve pattern and cut the fabric out.

    Step 3: Sewing the patterns
     Pin the shoulder with right sides facing each other. Then sew the raw egdes.

     Pin the side seams and sew them down.
    Attach the sleeves to the bodice right sides facing each other.

    Step 4: Cutting the pattern (Skirt)

    Measure the waist of the bodice and add about 10-15" to the waistline measurement. Since my fabric wasn't long enough to cut out the exact waistline, I cut out about four pieces of fabric which added to the waistline. The length of the skirt will be your own preference. I want to make a mini smock dress hence my length of the skirt is shorter than usual dress. 

    Since I have extra fabric and I wanted my smock dress to be slightly different from the normal ones you can get from stores, I cut out 2 sets of  5" by 5"with a fold at the side. These will be added to the sleeve making them ruffled sleeves. :D


    Step 5: Assembling the dress
    Since I have 4sets of the skirt, I first sew the 4sets to make it into one skirt. Then, attach the skirt to the bodice by adding small pleats. These pleats make it a smock dress. Now, sew down the skirt.
     Pin the 5"by 5" to the raw edges of the sleeve.

    Finally, hem the ends of the sleeves, neckline and skirt.
    So how did my smock dress go?


    Isn't it pretty?!

     Now who said you can't make your own smock dress?! HAHAHAHAHA!

    Next post will be on top with sexy bell sleeves~

    Recommended song: You are my everything- Gummy
      

    Sunday, March 20, 2016

    Upcycled~

    Hi!
    What are humans? When there's shawdowhunters world.

    While cleaning up my room, I found a pile of old clothes which were donated to/by me. Since clothes are originally made from fabric why not used them to make something simple and useful? So today, I'll be guiding you on how to make your very own pouches for keeping your sanitary pad and a pack of tissues! Interesting? HEHE. Let's get started! ^^

    Materials:
    • 2 Different Clothes/ Tops
    • Thread
    • Sewing Machine
    • Marker/ Chalk
    • Your preferred sanitary pad
    • A packet of tissue

    Sanitary pad pouch

    Measure and mark out 5"x5" on both clothes.

    Cut out the squares (5"x5" measurement). 

    With the two squares facing with the right sides together, sew all four sides leaving about 3cm open.
     

    Turn the square piece inside out and do a straight stitch all around sides.

    Measure and mark out 8"x5" on both clothes.

    Cut out the rectangles and with the right-right sides facing each other, sew the four sides leaving about 6cm open.

    Turn the rectangle piece inside out and do a straight stitch all around the sides.

    Place the square and rectangle pieces together with the outer layer facing each other.

    Sew the three sides to form a pouch.

    Turn the pouch inside out.
    Cut out 1"x3" piece of fabric and make a button loop.

    Sew the button loop to the rectangle piece of the pouch.

    Attach a button to the square piece of the pouch.

    Finally, you're done!!!


    Tissue packet pouch (1st Version)
       Measure and mark out 6"x4.5" on both clothes.
       

      Cut out the rectangles (6"x4.5" measurement).

      Sew all the four sides leaving about 4cm open, with the right side of the rectangles facing each other.

      Turn the rectangle piece inside out and do a straight stitch all around side.

      Fold the rectangle into half (3"x4.5") with the outer layer facing each other.

      Sew along one of the 3" sides.
      Sew along the 4.5" side, leaving 1" unsew at the top.

      Turn the pouch inside out!

      And you're done!!!


      Tissue packet pouch (2nd Version)
      Measure and mark out 5"x7" on both clothes.

      Cut out the rectangles (5"x7" measurement).

      With both the rectangles facing right-right side together, sew all the four sides leaving about 4cm open.

      Turn the rectangle piece inside out and do a straight stitch all around side.

       Fold 1.5" from the right of the 7" length and another 1.5" from the left.
      Sew down the folded sides.

      Then turn the pouch inside out.


      And you're done!!!


      Notes

      *The measurements given by me are based on the sanitary pads and packets of tissue I usually use. Hence, you do not need to follow the exact measurements given by me. You can alter the measurements depending on your own pads and tissues. :)

      *You may use only 1 piece of t-shirt or top for this project. I used two because I wanted the lining to be a different colour from the outer layer. :)


      Although it's the weekend, I have not touch my sewing machine at all to start on any project due to the bad headache I'm having right now. Hence, I won't be uploading any weekend DIY on my Instagram. This also means my blog won't be having any DIY post for quite awhile. Don't worry, I won't be gone for long! I promise to update as soon as possible with new project! HEHE! :D


      Recommended book: Lady Midnight- The Dark Artifices Book 1 (Cassandra Clare)

      Cassandra Clare has done it again. I cried and laughed while reading this book. This book is beyond amazing. Not that her other works aren't. It's just that she's done it way better than her previous works which means she's growing as a writer and I absolutely love and proud of it. And I can't wait for the 2nd book to be out! Patience is virtue! HAHA.

      Please visit my youtube channel, mahirah html :)

      Hi, I have no idea who is reading this. If you love to sew, DIY and see random unboxing, it will be great if you can subscribe to my chan...

      Labels