I skipped a whole month and here I am. HAHAHA.

OMG.
Looking at this picture shows how much time has passed. We're in our 20s now.
Let's celebrate our 30s, 40s and 50s together~~ HEHE.
ONESIE~
Today I am going to teach you how to make your very own onesie~
Since I am totally in love with Totoro (Of course Domo is still my number 1), I made a Totoro Onesie for myself. It's actually super easy to make but it requires plenty of time and patience. So remember to take your time so that the end product looks amazing (like what you could buy from store).
Let's get started~
Before you begin, you need to know what type of onesie you're making. For example, if you're planning to make a Stitch onesie, you need to get the necessary colours (Blue, Black, etc.). Since I am making a Totoro version, all I need are these various colours- Black, Grey and White.
Materials:
- Black- <0.5m of fleece
- White- <0.5m of fleece
- Grey- >1.5m of fleece
- Buttons/ Zip
- Stuffing- <250g
- Elastic band
Creating the body:
- Lie down and trace your body pattern or you can ask someone to help you trace out.
- The front bodice will be divided into two parts while the back bodice will be one piece.


- Sew both the shoulders with the right sides facing each other.
- Sew both of the side seams.
Creating the belly:
- Draw a huge semi-circle which fills up the front bodice and few inches below.
- Cut out two pieces of this pattern using the white fleece.
- Cut out eight pieces of crescent shapes using the grey fleece.


Assembling the belly:
- Sew 4 crescent shapes on each semi-circle.
- Sew the semi-circle on each front bodice (It is alright if the semi-circle touches the pants area).
- Sew the crotch area and the inner side seam which will create pants.


Attaching the sleeves:
- Copy the armhole area and create your sleeve pattern (You can choose to make it short or long sleeve).
- Cut out two pieces using the grey fleece.
- Sew the open ends.
- Pin the sleeves to the armholes and sew.


Attaching the Buttons/Zipper(I am using buttons instead of zipper):
- Mark out where you want the buttons to be placed.
- Create buttonholes for the respective buttons.
- Sew the buttons on the front bodice.

Attaching the hoodie:
- Measure the neckline.
- Cut out two pieces of a hoodie-like pattern whereby both pieces will add up to the measurement of the neckline.
- Sew the hoodie to the neckline.


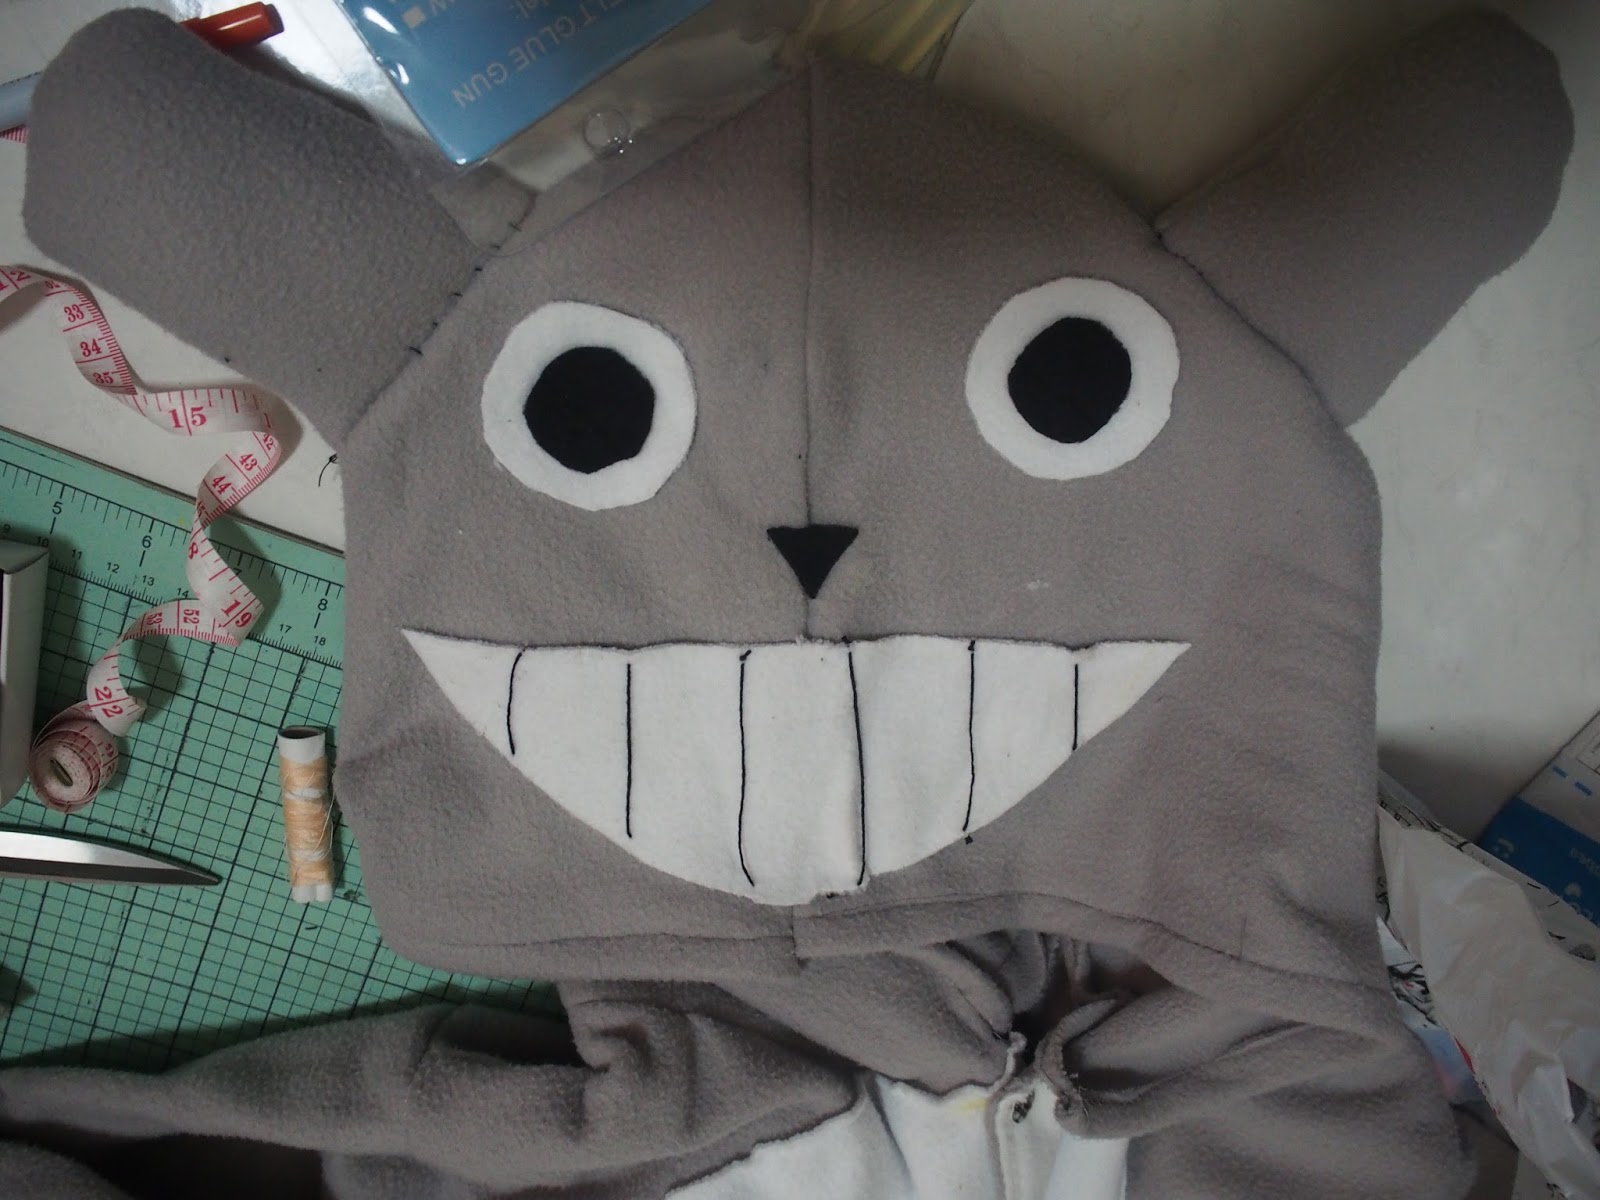
Creating Totoro:
- Cut two pieces of a long rectangle with a rounded tip (Grey) - A.
- Cut four pieces of a short rectangle with a rounded tip (Grey)- B.
- Cut a semi-circles (White).
- Cut two big circles (White).
- Cut two small circles (Black).
- Cut out a small triangle (Black).


Assembling Totoro Tail:
- Sew A with right sides facing each other.
- Put in stuffing into A.
- Place A at the back near the butt area and sew.
- Sew B with right sides facing each other.
- Put in stuffing into B
- Place B at the hoodie about 2-3 inches away from the side and sew.
- Using an embroidery thread, sew lines down the white semi-circle to create teeth.
- Attach the semi-circle using a fabric glue or hot glue on the bottom of the hoodie.
- Glue the small circle on top of the big circle which will create eye.
- Attach the eyes on hoodie using glue.
- Glue the small triangle to make it look like a nose.


Final touches:
- Hem the ends of the shoulder by adding bias tape.
- Hem the ends of the pants by folding in 1" and sew around but leave about 1-2" gap.
- Insert elastic band into the gap and close the opening by sewing.


Outcome:


YAY!!!
It looks amazing! I am so glad it turned out well.
If you're wondering how long it took me to finish this, I took about two weekends (less than 5 hours each) because I forgot to purchase black fleece and my machine wasn't coping so well with fleece fabric. Luckily, I switched the foot to ultra glide foot and it worked like magic. I also made some errors when cutting out the hoodie, eyes and nose. It took me awhile to get the right measurement to make the onesie looks like a totoro instead of some weird monster. HAHA. I used zigzag stitches, hand stitch and straight stitches when it comes to attaching the various parts. You will probably know which stitch works better when you're making it.
I hope that you find my website helpful and inspires you to make your own onesie. I have completed three sewing projects and have yet to update it on my blog so I am trying my very best to update them. Hence if you are interested to know what projects I am currently making or made, you can follow my Instagram account. Since I always upload my finished work there instead of here. My blog is kind of lagging. HAHA.
Thank you very much for reading! Lots and lots of love~
